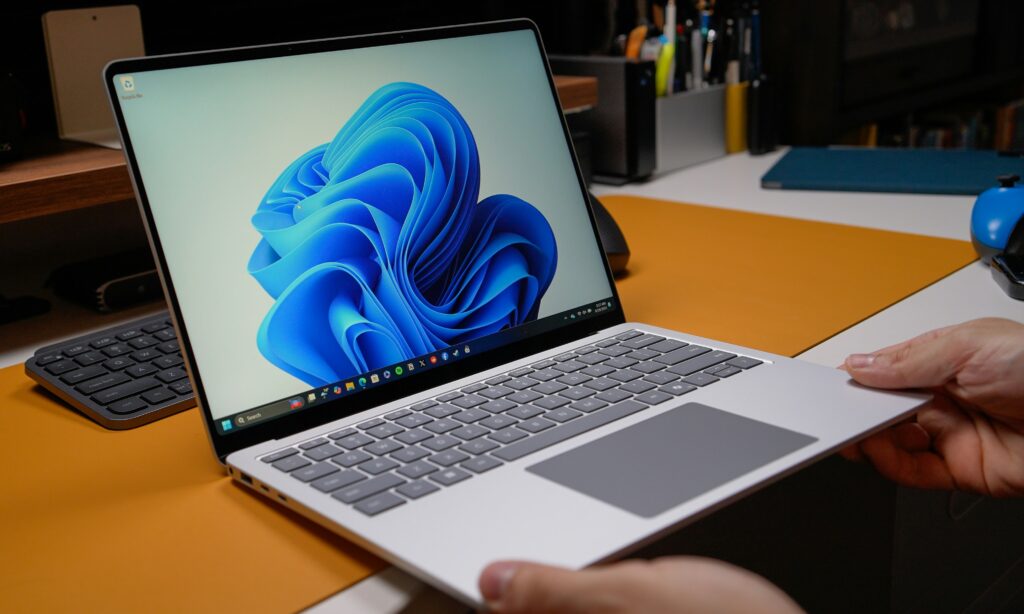
Is your Windows 11 PC running slower than it used to? Long startup times, sluggish apps, and background processes can make even a capable computer feel frustratingly slow.
The good news is that you don’t need expensive optimization software to improve everyday performance. Windows 11 includes several built-in tools that can help you reduce unnecessary background activity, free up storage, and improve responsiveness.
In this guide, we’ll walk through 10 safe, practical ways to speed up Windows 11, with clear instructions and explanations of what each change actually does.
Quick Answer: How to Make Windows 11 Faster
- Disable unnecessary startup apps in Settings → Apps → Startup.
- Free up storage using Settings → System → Storage.
- Install available Windows updates and restart your PC.
- Reduce unnecessary visual effects.
- Check Task Manager for apps consuming excessive CPU, memory, or disk resources.
These steps can improve responsiveness, especially on computers with limited RAM or storage. Results depend on your hardware and the cause of the slowdown.
Before You Start
Before making changes to your Windows 11 computer, keep these points in mind:
- Restart your PC first. A simple restart can resolve temporary slowdowns and clear processes that are no longer needed.
- Save your work. Close important documents before restarting or changing system settings.
- Use built-in Windows tools. Avoid third-party registry cleaners and applications promising instant performance boosts.
- Keep realistic expectations. Software adjustments can improve responsiveness, but they cannot compensate for severely outdated hardware or a failing storage drive.
Most of the methods in this guide are reversible and do not require advanced technical knowledge.
1. Disable Unnecessary Startup Apps
Many applications automatically launch when Windows starts. Having too many startup programs can increase boot time and consume memory before you even begin working.
Step-by-Step Instructions
- Press Windows + I to open Settings.
- Select Apps from the left sidebar.
- Click Startup.
- Review the list of applications configured to launch automatically.
- Turn off startup access for nonessential apps you recognize and don’t need immediately after signing in.
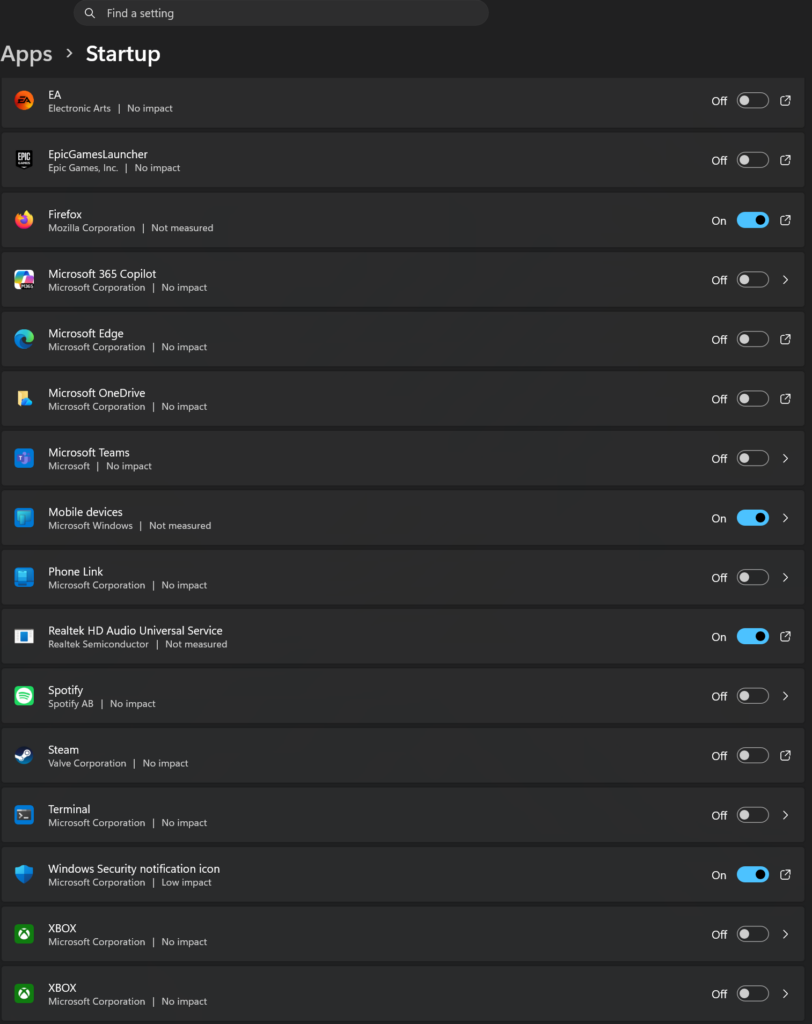
Important: Avoid disabling security software or applications required for your work unless you understand their purpose.
What This Improves
Reducing unnecessary startup programs can shorten startup time and decrease background memory usage. The improvement depends on how many applications were launching automatically.
2. Free Up Storage Space in Windows 11
When your system drive is nearly full, Windows may have less room for temporary files, updates, and other system operations. Freeing up storage can help prevent storage-related slowdowns and improve overall system reliability.
Step-by-Step Instructions
- Press Windows + I to open Settings.
- Select System from the left sidebar.
- Click Storage.
- Wait for Windows to analyze your storage usage.
- Select Temporary files to review files that Windows can remove.
- Carefully review the selected categories before clicking Remove files.
- Return to Storage and consider enabling Storage Sense to help manage temporary files automatically.
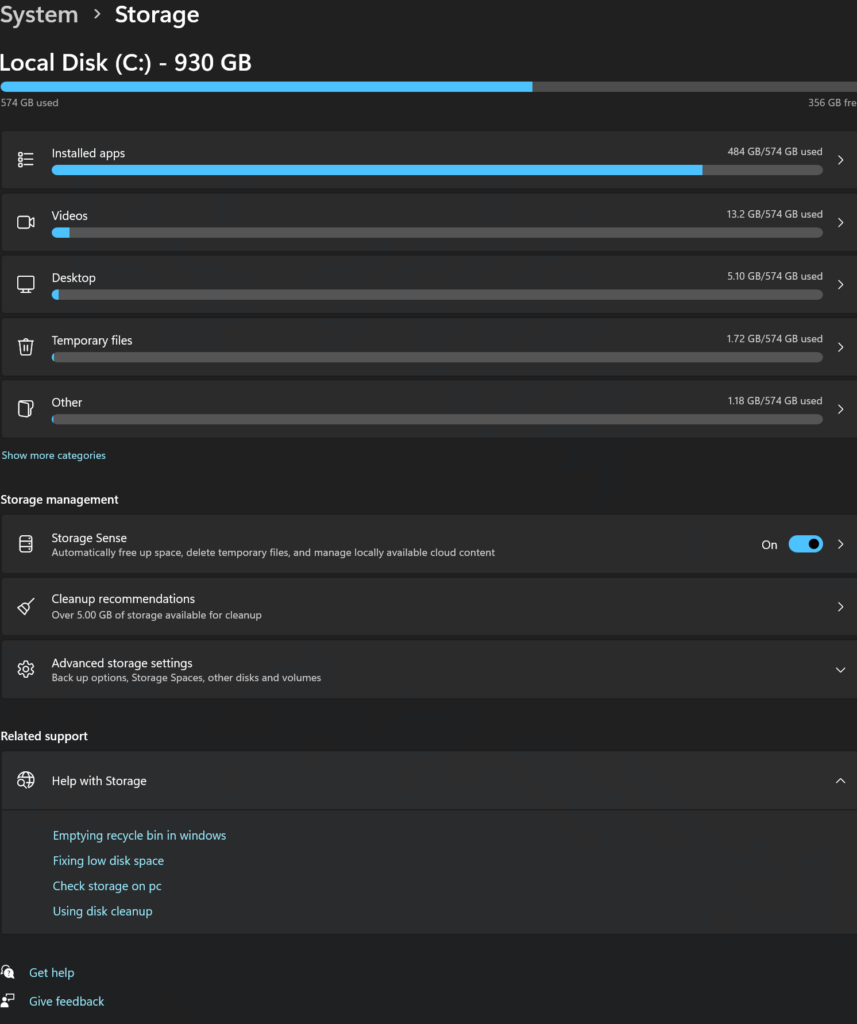
Important: Do not select Downloads or Recycle Bin for deletion unless you have checked that you no longer need those files. Some cleanup options may remove files needed to roll back a Windows update.
What This Improves
Freeing up storage creates room for Windows updates, temporary files, and everyday applications. The benefit is greatest when the system drive is running low on available space.
3. Update Windows 11 and Device Drivers
Keeping Windows 11 up to date can improve system stability, fix bugs, and resolve compatibility issues that may affect performance. Microsoft also distributes certain hardware driver updates through Windows Update.
Although updates won’t automatically make every computer faster, they are an important part of maintaining a reliable system.
Step-by-Step Instructions
- Press Windows + I to open Settings.
- Select Windows Update from the left sidebar.
- Click Check for updates.
- Download and install available recommended updates.
- Restart your computer if Windows asks you to.
- Return to Windows Update → Advanced options → Optional updates to check whether additional driver updates are available.
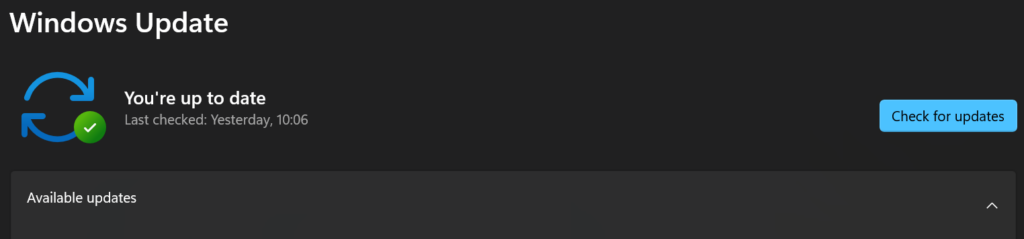
Important: Optional driver updates are not always necessary. If your hardware is working correctly, avoid installing optional drivers without a specific reason. For graphics cards and other specialized hardware, you can also check the manufacturer’s official support website.
What This Improves
Windows updates can fix known performance problems, improve compatibility, and resolve stability issues. Driver updates may help when outdated or faulty drivers are causing specific problems.
4. Reduce Visual Effects in Windows 11
Windows 11 uses animations, shadows, and visual effects to create a modern desktop experience. While these features look attractive, they can consume additional system resources.
Reducing unnecessary visual effects may improve responsiveness, particularly on older computers or devices with limited hardware resources.
Step-by-Step Instructions
- Press Windows + R to open the Run dialog.
- Type SystemPropertiesPerformance.exe and press Enter.
- In the Performance Options window, select the Visual Effects tab.
- Choose Adjust for best performance to disable most visual effects, or select Custom to disable individual effects.
- For a more comfortable appearance, consider keeping Smooth edges of screen fonts enabled.
- Click Apply, then OK.
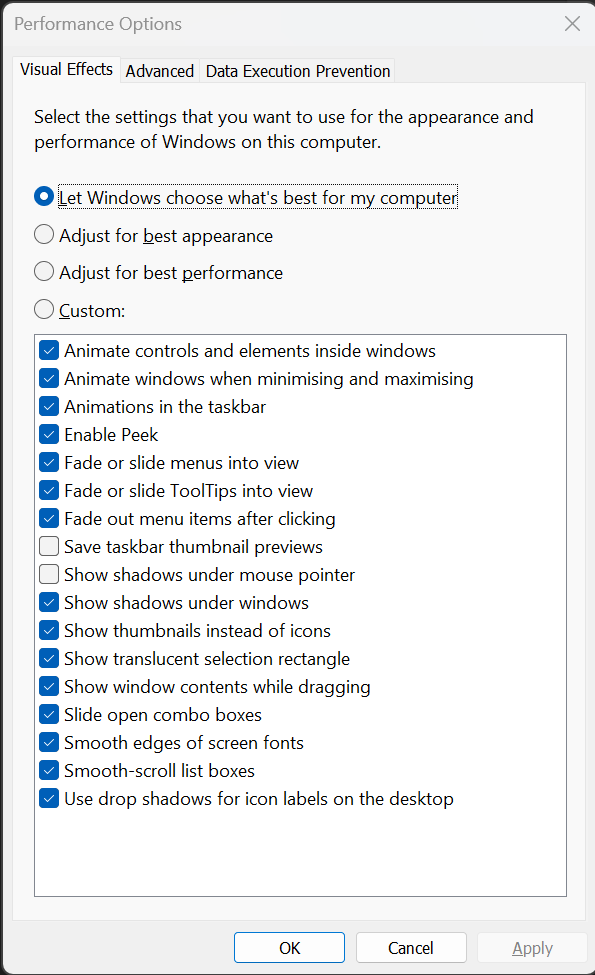
Important: These changes affect how Windows looks, not your personal files. You can restore the original settings by selecting Let Windows choose what’s best for my computer.
What This Improves
Reducing animations and visual effects can make menus and windows feel more responsive. The improvement is usually more noticeable on lower-powered computers than on modern high-performance systems.
5. Check Resource Usage in Task Manager
If your Windows 11 computer feels slow, an application running in the background may be consuming too much CPU, memory, or disk activity.
Windows Task Manager helps you identify resource-intensive applications and understand what might be slowing down your computer.
Step-by-Step Instructions
- Press Ctrl + Shift + Esc to open Task Manager.
- Select Processes from the left sidebar.
- Click the CPU column heading to sort applications by processor usage.
- Check the Memory and Disk columns to identify other resource-intensive processes.
- Look for applications using unusually high resources over an extended period.
- If an application is unresponsive and you recognize it, save your work if possible, select the application, and click End task.
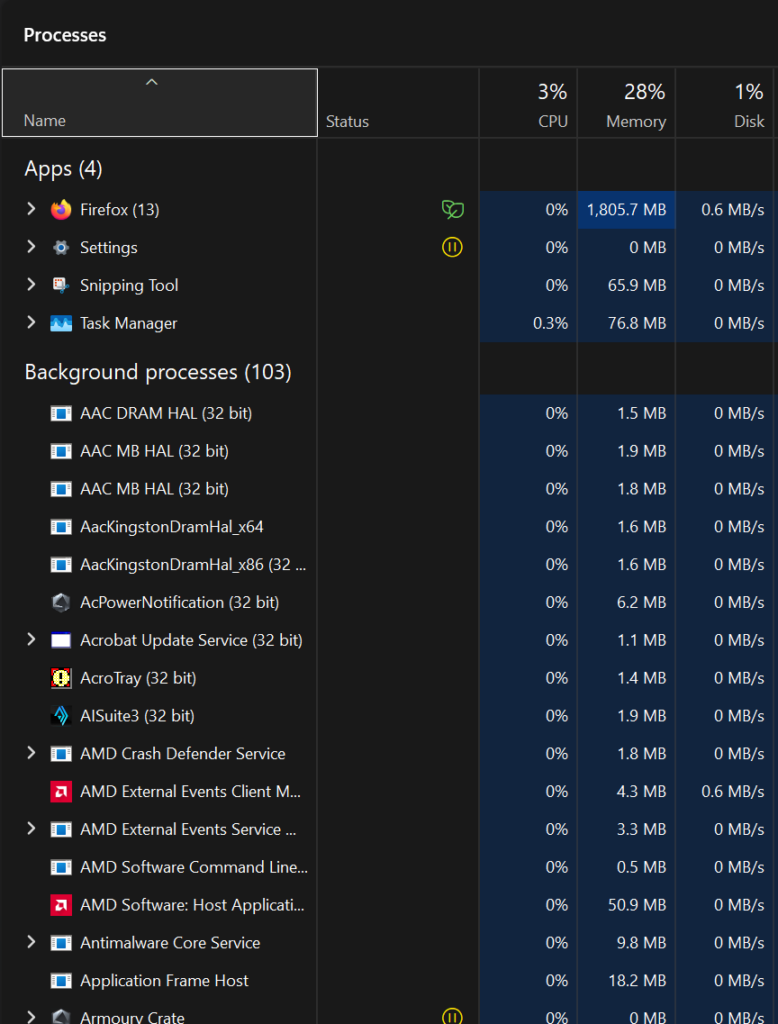
Important: Do not end unfamiliar Windows system processes. Closing an application through Task Manager may cause unsaved work to be lost. High resource usage during updates or demanding tasks can also be normal.
What This Improves
Task Manager helps you identify the actual cause of slowdowns instead of making unnecessary system changes. Closing a malfunctioning application may restore responsiveness, but ending a task is usually a temporary fix.
6. Uninstall Unused Applications in Windows 11
Over time, your computer can accumulate applications you no longer use. Some of these programs take up valuable storage space, while others may run background services or launch automatically when Windows starts.
Removing unnecessary software can help keep your system organized and may improve performance.
Step-by-Step Instructions
- Press Windows + I to open Settings.
- Select Apps from the left sidebar.
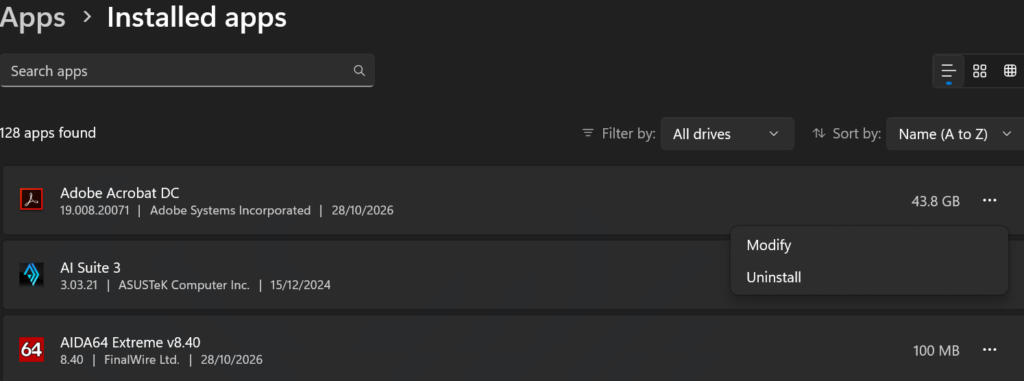
- Click Installed apps.
- Review the list of installed applications.
- Find a program you no longer need and click the three-dot menu (⋯) next to it.
- Select Uninstall and follow the on-screen instructions.
- Restart your computer if the uninstaller requests it.
Important: Do not uninstall unfamiliar applications, hardware drivers, or Microsoft system components unless you understand their purpose. Some programs are required for other applications or devices to work correctly.
What This Improves
Uninstalling unused applications frees up storage space and can reduce background activity when those applications install startup tasks or services. Removing a program does not automatically improve performance if it was not consuming resources.
7. Adjust Power Mode for Better Performance
Windows 11 includes power settings that let you balance energy consumption and system performance. Choosing the right power mode may help your computer respond more quickly, especially on laptops.
Step-by-Step Instructions
- Press Windows + I to open Settings.
- Select System from the left sidebar.
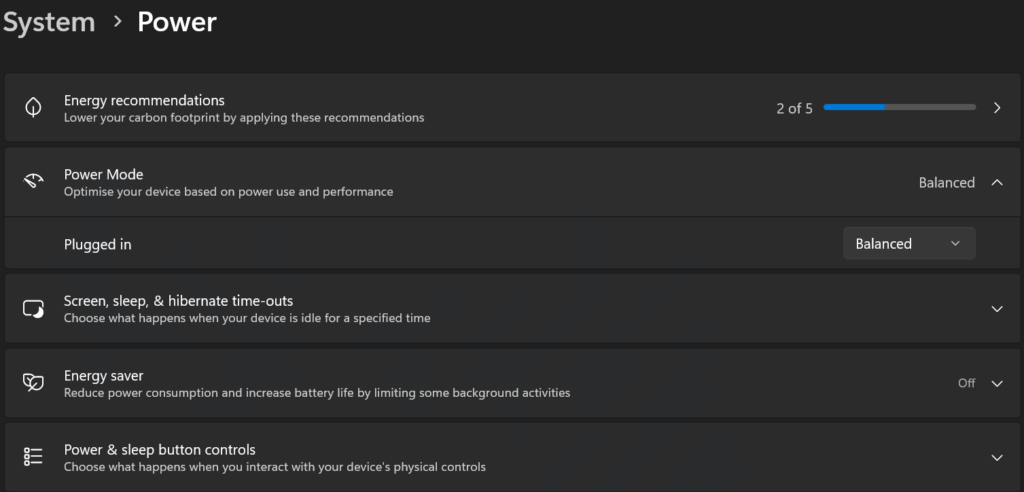
- Click Power & battery (on some desktop computers, this appears as Power).
- Find Power mode, if available.
- Select Best performance from the dropdown menu.
- Use your computer normally and check whether you notice an improvement.
Important: Best performance mode may increase energy consumption, heat, and fan noise, and reduce battery life on laptops. The option may not be available on every computer or with every power plan.
What This Improves
Changing the power mode can allow Windows to prioritize performance over energy efficiency. However, the actual improvement depends on your hardware, workload, and current power settings.
8. Scan for Malware Using Windows Security
Malware, viruses, and other unwanted software can negatively affect your computer’s performance. Some malicious programs run silently in the background, consuming system resources and potentially compromising your security.
Windows 11 includes Microsoft Defender Antivirus, a built-in security solution that can help detect and remove threats without installing additional antivirus software.
Step-by-Step Instructions
- Press Windows + I to open Settings.
- Select Privacy & security from the left sidebar.
- Click Windows Security.
- Select Virus & threat protection.
- Under Current threats, click Quick scan.
- Wait for Windows Security to complete the scan.
- Review the results and follow any recommended actions if threats are detected.
- Note: If you use a third-party antivirus program such as AVG, Avast, or Bitdefender, Microsoft Defender’s Quick scan button may not appear. In that case, open your installed antivirus application and use its built-in scanning feature instead. You do not need to uninstall your existing antivirus.

For a more thorough scan, select Scan options → Full scan. This may take considerably longer, depending on the number of files stored on your computer.
Important: Microsoft Defender Antivirus may not be active if another antivirus solution is installed. Never disable your antivirus protection to improve performance.
What This Improves
Removing malicious software can reduce unwanted background activity, improve system stability, and protect your personal information. However, an antivirus scan will not necessarily make a clean computer faster.
9. Optimize Your Drive in Windows 11
Windows 11 includes a built-in tool called Optimize Drives that helps maintain storage performance. The tool automatically identifies the type of drive and applies the appropriate optimization method.
For traditional hard disk drives (HDDs), Windows can reorganize fragmented files. For solid-state drives (SSDs), Windows typically uses TRIM and other SSD-appropriate maintenance operations.
Step-by-Step Instructions
- Open the Start menu.
- Type Defragment and Optimize Drives in the search box.
- Open the application from the search results.
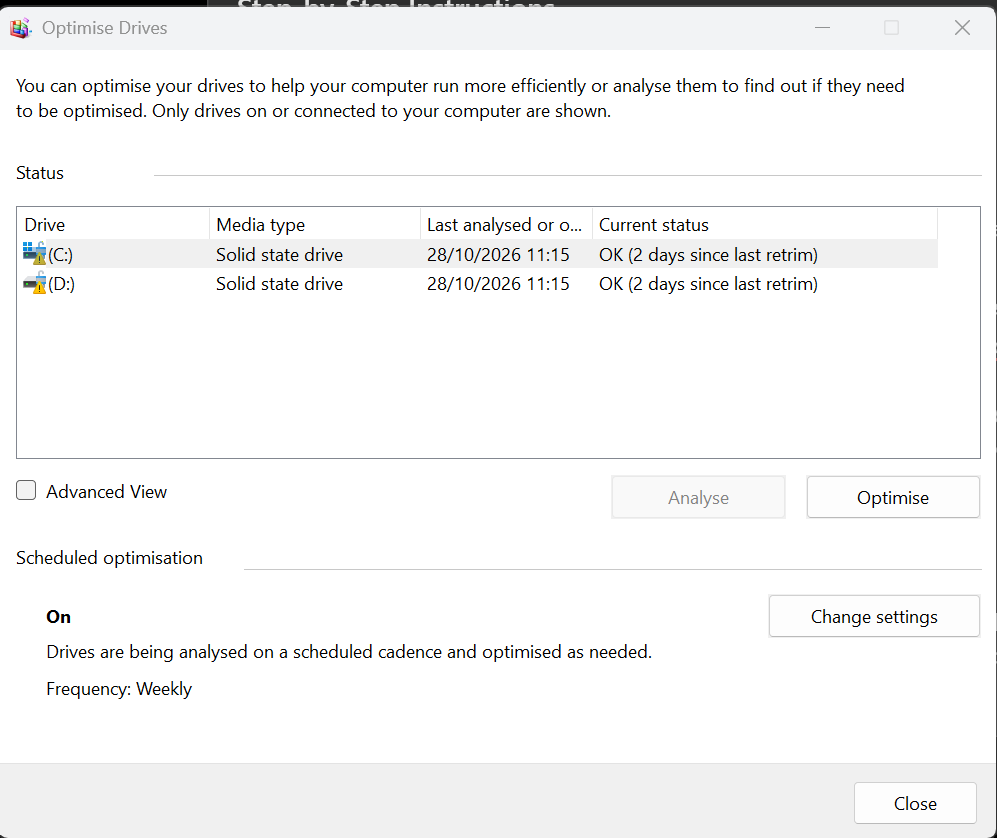
- Select your system drive, usually C:.
- Check the Media type column to see whether Windows identifies it as a solid-state drive or hard disk drive.
- Click Optimize to let Windows perform the appropriate maintenance operation.
- Check the Scheduled optimization section to make sure automatic optimization is enabled.
Important: Windows 11 usually handles drive optimization automatically. You do not need to run it frequently or install third-party defragmentation tools. Never manually force traditional HDD-style defragmentation on an SSD using unsupported utilities.
What This Improves
Drive optimization helps maintain storage efficiency over time. It can improve file access on fragmented HDDs and support SSD maintenance, but it may not produce a noticeable speed increase on an already healthy system.
Step 10: Restart Your PC Regularly
Restarting your Windows 11 computer is one of the simplest ways to maintain smooth performance. Over time, running applications and background processes can consume system memory and cause your PC to feel slower.
A restart closes running applications, clears temporary data stored in RAM, and gives Windows a fresh start. It can also help complete pending updates and resolve minor software issues.
How to Restart Windows 11
- Save your work and close any open applications.
- Click the Start button on the taskbar.
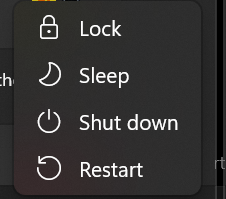
- Click the Power icon.
- Select Restart from the menu.
- Wait for Windows 11 to restart completely.
Tip: If you usually put your computer to sleep instead of shutting it down, try restarting it occasionally, especially when applications become unresponsive or the system feels sluggish.
Important: Restarting your PC does not delete personal files or installed applications. However, unsaved work may be lost, so always save your documents before restarting.
Additional Resources
Conclusion: Make Windows 11 Run Faster
You don’t need expensive upgrades or complicated software to improve your Windows 11 PC’s performance. Simple maintenance tasks, such as disabling unnecessary startup apps, freeing up storage, installing updates, and restarting your computer, can make a noticeable difference.
For the best results, start with the steps that address your computer’s specific problems. If your PC takes too long to start, review your startup applications. If it becomes sluggish during everyday tasks, check Task Manager for high CPU, memory, or disk usage.
Remember that performance improvements depend on your hardware and the underlying cause of the slowdown. If your computer remains slow after trying these methods, you may need to investigate hardware limitations, overheating, or other system issues.
The key takeaway: Keep Windows updated, remove unnecessary software, and perform regular maintenance to help your PC stay responsive over time.